Develop Azure Compute Solutions (25-30%)
Create ARM templates
Create ARM templates
Create and deploy ARM templates by using the Azure portal

Generate a template using the portal
In a web browser, go to the Azure portal and sign in.
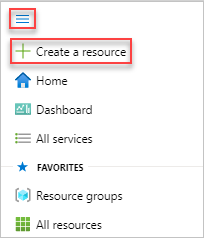
From the Azure portal menu, select Create a resource.
Select Storage > Storage account.

Enter the following information:
You can use the default values for the rest of the properties.
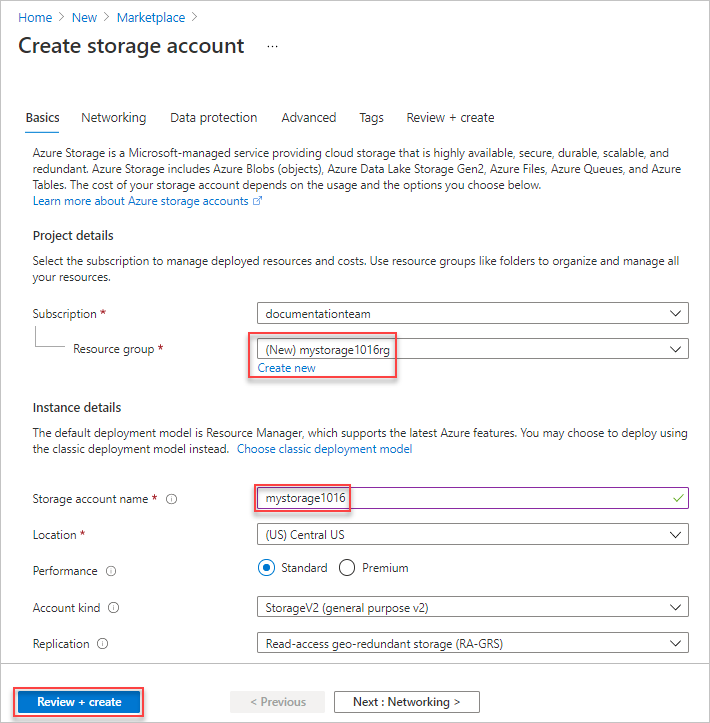
Select Review + create on the bottom of the screen. Do not select Create in the next step.
Select Download a template for automation on the bottom of the screen. The portal shows the generated template:
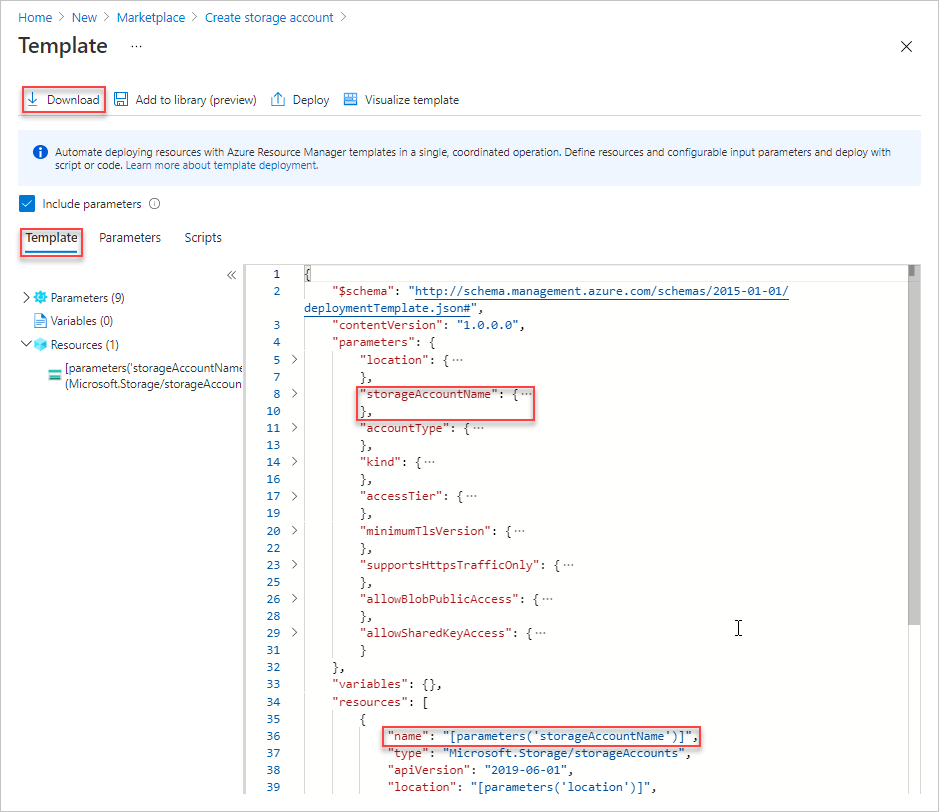
The main pane shows the template. It is a JSON file with six top-level elements -
schema,contentVersion,parameters,variables,resources, andoutput. For more information, see Understand the structure and syntax of ARM templates
There are eight parameters defined. One of them is called storageAccountName. The second highlighted part on the previous screenshot shows how to reference this parameter in the template. In the next section, you edit the template to use a generated name for the storage account.
In the template, one Azure resource is defined. The type is
Microsoft.Storage/storageAccounts. Take a look of how the resource is defined, and the definition structure.Select Download from the top of the screen.
Open the downloaded zip file, and then save template.json to your computer. In the next section, you use a template deployment tool to edit the template.
Select the Parameter tab to see the values you provided for the parameters. Write down these values, you need them in the next section when you deploy the template.

Using both the template file and the parameters file, you can create a resource, in this tutorial, an Azure storage account.
Edit and deploy the template
The Azure portal can be used to perform some basic template editing. In this quickstart, you use a portal tool called Template Deployment. Template Deployment is used in this tutorial so you can complete the whole tutorial using one interface - the Azure portal. To edit a more complex template, consider using Visual Studio Code, which provides richer edit functionalities.
Azure requires that each Azure service has a unique name. The deployment could fail if you entered a storage account name that already exists. To avoid this issue, you modify the template to use a template function call uniquestring() to generate a unique storage account name.
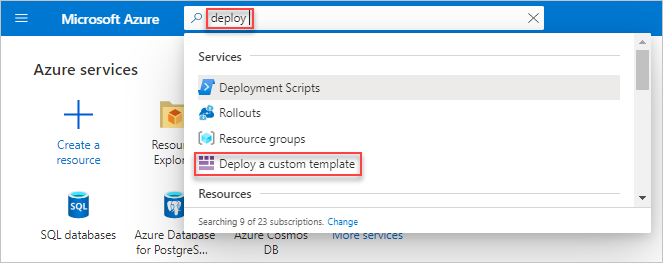
From the Azure portal menu, in the search box, type deploy, and then select Deploy a custom template.
Select Build your own template in the editor.
Select Load file, and then follow the instructions to load template.json you downloaded in the last section.
Make the following three changes to the template:

Remove the storageAccountName parameter as shown in the previous screenshot.
Add one variable called storageAccountName as shown in the previous screenshot:
JSON"storageAccountName": "[concat(uniqueString(subscription().subscriptionId), 'storage')]"Two template functions are used here:
concat()anduniqueString().Update the name element of the Microsoft.Storage/storageAccounts resource to use the newly defined variable instead of the parameter:
JSON"name": "[variables('storageAccountName')]",The final template shall look like:
JSON{ "$schema": "http://schema.management.azure.com/schemas/2015-01-01/deploymentTemplate.json#", "contentVersion": "1.0.0.0", "parameters": { "location": { "type": "string" }, "accountType": { "type": "string" }, "kind": { "type": "string" }, "accessTier": { "type": "string" }, "minimumTlsVersion": { "type": "string" }, "supportsHttpsTrafficOnly": { "type": "bool" }, "allowBlobPublicAccess": { "type": "bool" } }, "variables": { "storageAccountName": "[concat(uniqueString(subscription().subscriptionId), 'storage')]" }, "resources": [ { "name": "[variables('storageAccountName')]", "type": "Microsoft.Storage/storageAccounts", "apiVersion": "2019-06-01", "location": "[parameters('location')]", "properties": { "accessTier": "[parameters('accessTier')]", "minimumTlsVersion": "[parameters('minimumTlsVersion')]", "supportsHttpsTrafficOnly": "[parameters('supportsHttpsTrafficOnly')]", "allowBlobPublicAccess": "[parameters('allowBlobPublicAccess')]" }, "dependsOn": [], "sku": { "name": "[parameters('accountType')]" }, "kind": "[parameters('kind')]", "tags": {} } ], "outputs": {} }
Select Save.
Enter the following values:
Select Review + create.
Select Create.
Select the bell icon (notifications) from the top of the screen to see the deployment status. You shall see Deployment in progress. Wait until the deployment is completed.

Select Go to resource group from the notification pane. You shall see a screen similar to:
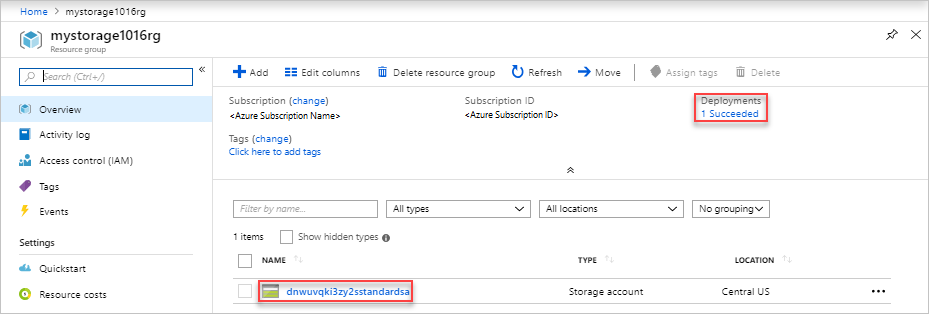
You can see the deployment status was successful, and there is only one storage account in the resource group. The storage account name is a unique string generated by the template. To learn more about using Azure storage accounts, see Quickstart: Upload, download, and list blobs using the Azure portal.
Create a container image for deployment to Azure Container Instances
Docker overview
Important
Because the Azure Cloud shell does not include the Docker daemon, you must install both the Azure CLI and Docker Engine on your local computer to complete this tutorial. You cannot use the Azure Cloud Shell for this tutorial.
az --version to find the version. If you need to install or upgrade, see Install the Azure CLI.Get application code
The sample application in this tutorial is a simple web app built in Node.js. The application serves a static HTML page, and looks similar to the following screenshot:

Use Git to clone the sample application's repository:
git clone https://github.com/Azure-Samples/aci-helloworld.git
You can also download the ZIP archive from GitHub directly.
Build the container image
The Dockerfile in the sample application shows how the container is built. It starts from an official Node.js image based on Alpine Linux, a small distribution that is well suited for use with containers. It then copies the application files into the container, installs dependencies using the Node Package Manager, and finally, starts the application.
FROM node:8.9.3-alpine
RUN mkdir -p /usr/src/app
COPY ./app/ /usr/src/app/
WORKDIR /usr/src/app
RUN npm install
CMD node /usr/src/app/index.js
Use the docker build command to create the container image and tag it as aci-tutorial-app:
docker build ./aci-helloworld -t aci-tutorial-app
Output from the docker build command is similar to the following (truncated for readability):
$ docker build ./aci-helloworld -t aci-tutorial-app
Sending build context to Docker daemon  119.3kB
Step 1/6 : FROM node:8.9.3-alpine
8.9.3-alpine: Pulling from library/node
88286f41530e: Pull complete
84f3a4bf8410: Pull complete
d0d9b2214720: Pull complete
Digest: sha256:c73277ccc763752b42bb2400d1aaecb4e3d32e3a9dbedd0e49885c71bea07354
Status: Downloaded newer image for node:8.9.3-alpine
 ---> 90f5ee24bee2
...
Step 6/6 : CMD node /usr/src/app/index.js
 ---> Running in f4a1ea099eec
 ---> 6edad76d09e9
Removing intermediate container f4a1ea099eec
Successfully built 6edad76d09e9
Successfully tagged aci-tutorial-app:latest
Use the docker images command to see the built image:
docker images
Your newly built image should appear in the list:
$ docker images
REPOSITORY          TAG       IMAGE ID        CREATED           SIZE
aci-tutorial-app    latest    5c745774dfa9    39 seconds ago    68.1 MB
Run the container locally
Before you deploy the container to Azure Container Instances, use docker run to run it locally and confirm that it works. The -d switch lets the container run in the background, while -p allows you to map an arbitrary port on your computer to port 80 in the container.
docker run -d -p 8080:80 aci-tutorial-app
Output from the docker run command displays the running container's ID if the command was successful:
$ docker run -d -p 8080:80 aci-tutorial-app
a2e3e4435db58ab0c664ce521854c2e1a1bda88c9cf2fcff46aedf48df86cccf
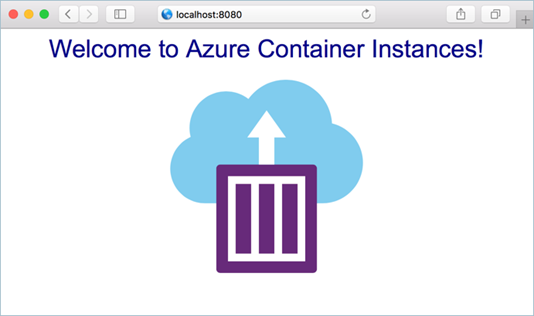
Now, navigate to http://localhost:8080 in your browser to confirm that the container is running. You should see a web page similar to the following:
Create an Azure container registry and push a container image
Create Azure container registry
Before you create your container registry, you need a resource group to deploy it to. A resource group is a logical collection into which all Azure resources are deployed and managed.
Create a resource group with the az group create command. In the following example, a resource group named myResourceGroup is created in the eastus region:
az group create --name myResourceGroup --location eastus
Once you've created the resource group, create an Azure container registry with the az acr create command. The container registry name must be unique within Azure, and contain 5-50 alphanumeric characters. Replace <acrName> with a unique name for your registry:
az acr create --resource-group myResourceGroup --name <acrName> --sku Basic
Here's partial output for a new Azure container registry named mycontainerregistry082:
{
  "creationDate": "2020-07-16T21:54:47.297875+00:00",
  "id": "/subscriptions/<Subscription ID>/resourceGroups/myResourceGroup/providers/Microsoft.ContainerRegistry/registries/mycontainerregistry082",
  "location": "eastus",
  "loginServer": "mycontainerregistry082.azurecr.io",
  "name": "mycontainerregistry082",
  "provisioningState": "Succeeded",
  "resourceGroup": "myResourceGroup",
  "sku": {
    "name": "Basic",
    "tier": "Basic"
  },
  "status": null,
  "storageAccount": null,
  "tags": {},
  "type": "Microsoft.ContainerRegistry/registries"
}
The rest of the tutorial refers to <acrName> as a placeholder for the container registry name that you chose in this step.

Comments
Post a Comment